Learn CSS and stylesheets with CSS Bro
![]() CSS was invented over twenty years ago, around the same time JavaScript was created. The web we know today could not exist without CSS or JavaScript: CSS has become so advanced that you can actually program (very simple) apps with CSS only. (Do an online search for "
CSS was invented over twenty years ago, around the same time JavaScript was created. The web we know today could not exist without CSS or JavaScript: CSS has become so advanced that you can actually program (very simple) apps with CSS only. (Do an online search for "CSS experiments
" - you'll be amazed.)
The basics: what is CSS?
 CSS stands for "
Cascading Style Sheets
". The "style sheets
" part is self-explanatory: those are the files whose content adds styling your HTML content.
A "cascade
" is a small waterfall: water falls through from the top and ends at the bottom. At the bottom, you have a mix of water that comes from all levels.
This not-so-great metaphor describes what happens with CSS. (It's especially unclear since most people don't know what a cascade is, so they can't relate to the concept from the start). I'll do my best to clarify.
User Agent Styles
Elements have default styles in your browser: a top-header (<h1>), for example, is much larger than regular text. That's the "user-agent styles
" - meaning the ones built into your browser. If you manually add a style to <h1> tags, your styles will cascade over (overwrite) the browser's default styling for that element. Here are two <h1> tags - one with default styling and one with custom styling: 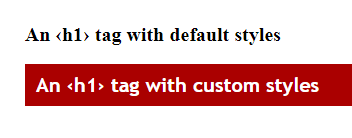
Rules, declarations, selectors properties, and values
A CSS file contains two things: comments (ignored by the browser, only there to help humans) and CSS code that adds styles to various HTML elements.
CSS Comments
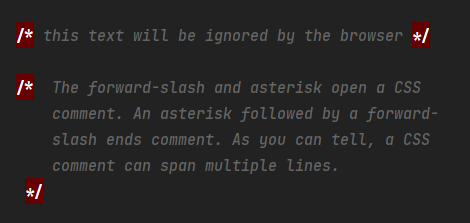
You start a CSS comment by typing a forward-slash and an asterisk, without spaces in between: /*. Anything that follows these two characters will be ignored by the browser. To end a CSS comment, type these same characters in reverse - an asterisk followed by an asterisk: */. Below are two separate CSS comments. The first one is a "single-line comment
" and the second is a "multiline comment
": 
CSS Rules
A CSS rule is a label for CSS code. That label determines what elements will be affected. The content of the rule describes the changes that this rule will make on the elements matched by the label. For example, a rule can make all buttons red. Or only some buttons. Or all links - etc. A rule contains two parts: the selector is the label that describes the targeted elements. The second part is the body of the rule: an opening curly brace { starts the body of the rule, and a closing curly brace ends } the body. Here's a rule that affects any button in our document: 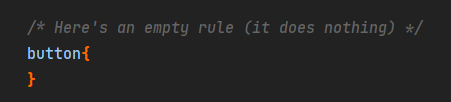
This is an empty rule: since there's nothing between the curly braces, that rule doesn't do anything. Some people like to put a space before the opening curly brace. I don't. Others like putting the opening curly brace on its own line. I don't either. It doesn't matter: use the convention that makes sense in your brain.
Selectors
The label I talked about is called a selector. That's because it selects the HTML elements that are targeted. In the empty rule above, CSS actually did something: it looked at the web page and selected all <button> elements. But nothing happened visually since we didn't tell it what to do to buttons. A selector can be a tag name (button, h1, p, etc.) It can also be other things we'll cover later.
Notice how on this page the secondary headings (h2 and h3) look similar. That's because I have a CSS rule that targets both and applies some shared styles to all h2 elements and all h3 elements. Fortunately, I didn't have to write a duplicate rule. Several selectors, separated by a comma, can share the same rule. This rule assigns to all secondary headers a blue background and some white text: 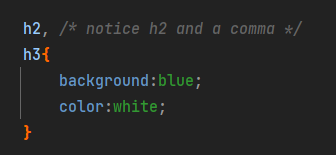
Declarations
A CSS declaration is a visual instruction. The selector portion of the rule told the browser what element(s) to match. The body portion of the rule contains one or more declarations (instructions). Each declaration includes a property name and a value for that property. A property is like a CSS attribute: each element has a font size, a color, sometimes a border, etc. All these attributes can be customized using a CSS property. The value you type after the property applies the change.
Below is a rule that gives all buttons on our page a red background. Notice the colon (:) after the property and the semicolon (;) after the value: 
Since text would be hard to read, let's add a second declaration to our rule: 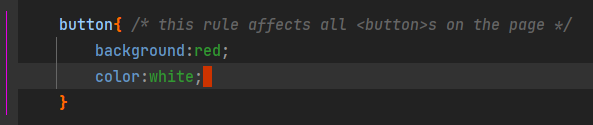
Linking a stylesheet from a web page
One way to import styles into your website is by using the <link> tag. When you add the rel attribute and set it to stylesheet, the browser knows that it's supposed to retrieve styles from a CSS file. A specialized editor or IDE will also know that and helpfully suggest CSS (or SASS/SCSS) files: 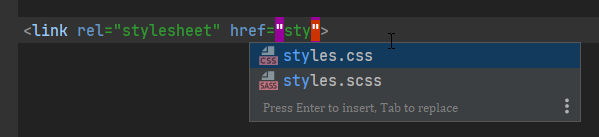
Hard-coding styles into a web page
Another way to spruce up a web page is to include a <style> tag in your HTML file. Ideally, you should place your <style> tag in the <head> tag. When a web browser parses your HTML code, it will first look for external resources to download inside the <head> tag (see tip below). The only content you should type inside a <style> tag is CSS rules or CSS comments, like this: 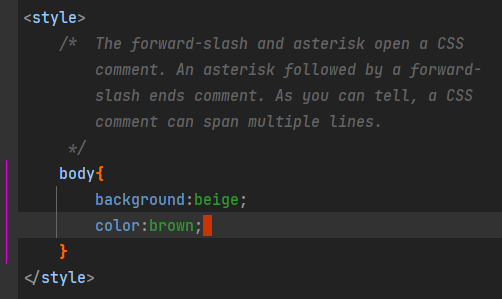
Injecting styles into a specific element
Nearly all HTML elements support the style attribute. The value (content) of the style attribute is any valid CSS code: that includes CSS comments and CSS declarations. Styles added that way are called "inline styles", and they have the highest cascading priority. Here's an example of inline styles for a <p> tag: ![]()